🆔
Twitter auth in Rails (1/2)
on programminglast updated 1/24/21
Intro
This is the first half of a tutorial for using an OmniAuth strategy to implement user authentication with Twitter in a Rails app.
If you're allergic to jargon, that just means allowing users to log in with their Twitter account. No need for yet another password.
It's also interesting because your application can then access information associated with the user's Twitter account: follows, followers, likes, lists — pretty much everything except bookmarks.
Here is a simple example of what we're working towards.
I recommend testing out the example linked above, reading my summary below, and maybe also watching a quick video before trying to work through this entire tutorial.
Summary
- user visits homepage and clicks sign on button
- user is redirected to Twitter-hosted page to log into their Twitter account
- a request is sent to Twitter's servers which respond with details for the user's account
- with user's account details, a user record is retrieved from or created in your database
- details related to that user record are stored in the session
- user is redirected to a different page
- user eventually clicks sign out button, the session is cleared, and they're redirected
Stubbing out a backend and homepage
So you run rails new <app_name> or lean on railsnew.io to create the skeleton for your application. Maybe you also generate resources and add basic associations to the models, before migrating your database.
In short, we'll need a Rails app connected to a Postgres database for storing user information. I've included some commands here that I might use in setting this up:
# creating the Rails app
rails new liked -d postgresql

# generating models and controllers for three basic resources
rails g resource User uid:string name:string handle:string
rails g resource Follow uid:string name:string handle:string user_id:integer
rails g resource Like tid:string url:string follow_id:integer
# adding associations to the models
# liked/app/models/user.rb
class User < ApplicationRecord
  has_many :follows
end

# liked/app/models/follow.rb
class Follow < ApplicationRecord
  belongs_to :user
  has_many :likes
end

# liked/app/models/like.rb
class Like < ApplicationRecord
  belongs_to :follow
end

# migrating the database
rake db:create RAILS_ENV=development
rake db:migrate
This is a good time to connect to Heroku; the Heroku URL will help with accessing the Twitter API. We'll add a simple route along with its corresponding controller action and view, clean up our database.yml file, and deploy what we have so far to ensure everything is working properly.
# liked/config/routes.rb - adding a route
Rails.application.routes.draw do
  root 'users#home'
end

# liked/app/controllers/users_controller.rb - adding a controller action
class UsersController < ApplicationController
  def home
  end
end
# liked/app/views/users/show.erb - adding a view
<p>put anything here to verify nothing is already broken</p>
# liked/config/database.yml - need to configure this for Heroku deploy
default: &default
  adapter: postgresql
  encoding: unicode
  pool: <%= ENV.fetch("RAILS_MAX_THREADS") { 5 } %>

development:
  <<: *default
  database: liked_development

test:
  <<: *default
  database: liked_test

production:
  <<: *default
  url: <%= ENV['DATABASE_URL'] %>
  username: admin
# using the Heroku CLI tool to deploy
heroku login # log into Heroku
git init
git add .
git commit -m "first commit"
heroku create liked-it # create a Heroku app
git push heroku main # deploy Rails app to Heroku
heroku run rake db:migrate # migrate the database to Heroku
I recommend Heroku's documentation for troubleshooting issues with any of the above.
Finally, we'll add a link on the homepage to a Twitter-hosted login page. This link won't function properly until we set up OmniAuth and our Twitter developer portal.
# liked/app/views/users/show.erb
<%= button_to "/auth/twitter", method: :get %>
Configuring the Twitter developer portal
Either log into your Twitter developer portal or apply for an account.
Add the dotenv-rails gem to the Gemfile and create a .env file at the root of the project directory. Back in the Twitter developer portal, we'll create an app and copy over the API key & API secret key to this .env file, before editing the app's settings.
# liked/.env - ensure this is included in your .gitignore file!
TWITTER_API_KEY=yourkeyhere
TWITTER_API_SECRET=yoursecrethere
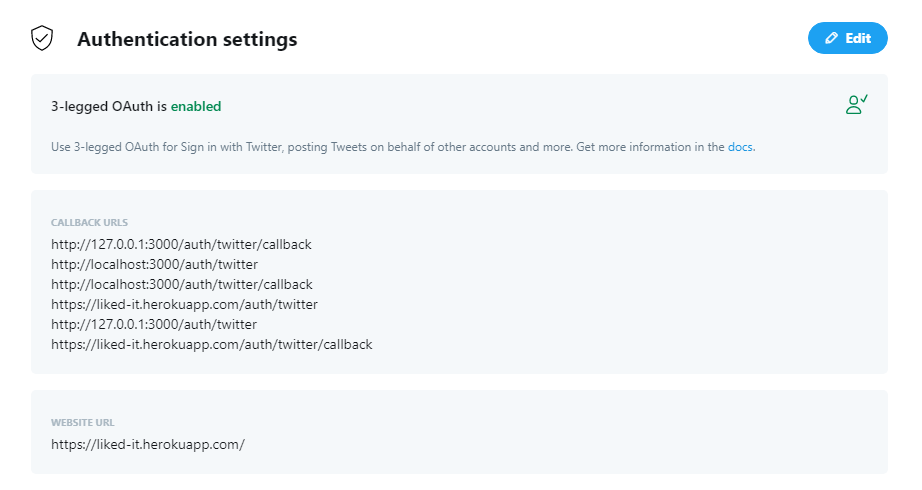
The only section we'll tweak is Authentication settings. In it, we need to toggle on 'Enable 3-legged OAuth' before adding the required 'Website URL' and 'Callback URLs'.
'Website URL' must be the Heroku URL we created earlier (https://... and not http://...), using localhost won't work.
Upon signing into their Twitter account, users are redirected back to our application — specifically to these 'Callback URLs'. 'Callback URLs' is where we'll include routes for testing locally and in production on Heroku.
There were two Stack Overflow threads (here and here) that helped me debug the 403 errors I eventually ran into. I suggest reading both threads and adding these six routes to 'Callback URLs'.
http://localhost:3000/auth/twitter
http://localhost:3000/auth/twitter/callback
http://127.0.0.1:3000/auth/twitter
http://127.0.0.1:3000/auth/twitter/callback
https://your-heroku-url-here/auth/twitter
https://your-heroku-url-here/auth/twitter/callback

In part 2, we walk through the rest of this process: configuring OmniAuth, handling the Twitter API response, creating & storing user records in the database, and allowing users to log out too.